The other day at Target I found this mystery E.L.F. polish for $2, and decided to give it a go. I loved the color in the bottle, even though I'm normally not a green fan.
It went on pretty nice. What you see here is only one coat. Two would probably be better for coverage, but you could certainly get away with one in a pinch.
Sadly, as soon as the polish touched my nail, I could tell it wasn't going to work out. The color looks awful on me. It's much more olive than the emerald it appeared in the bottle, so I handed it over to my roommate since olive is her favorite color.
Target had a whole collection of these, so I might try another color. My only complaint was that the brush length to cap diameter ratio was rather disproportionate, and it made it a little difficult to apply with any accuracy, since the big clunky cap kept blocking my view of the brush. The polish itself, however, is really nice and well worth the $2.
Showing posts with label swatches. Show all posts
Friday, October 19, 2012
Monday, October 1, 2012
Dud
My weekend manicure was a little bit of a change for me. I decided to use the unnamed pinky-purple Color Zone polish. If you remember, this came from a neon kit I acquired some time ago, and quickly decided I didn't like the neon pink or the clear glitter that came with it, so it was several weeks before I even tried this polish.
Despite how poorly the bright pink preformed, I really like the way this one came out. Next to the pink, I would have called it purple, but as you can see that isn't really the case. It does have some glitter in it, but mostly it shows up as a texture rather than shine. Still, I love the color and I kept looking at it at work.
I was a little disapointed in this manicure, because I wasn't just test driving the Color Zone, but a Wet n Wild polish I picked up at Giant Eagle (more on that this Friday).
Despite how poorly the bright pink preformed, I really like the way this one came out. Next to the pink, I would have called it purple, but as you can see that isn't really the case. It does have some glitter in it, but mostly it shows up as a texture rather than shine. Still, I love the color and I kept looking at it at work.
I was a little disapointed in this manicure, because I wasn't just test driving the Color Zone, but a Wet n Wild polish I picked up at Giant Eagle (more on that this Friday).
I thought, hey, it's $1.99 Wet n Wild. I like them. And I've been wanting a glow in the dark, Plus, cute tombstone bottle. What could go wrong?
Turns out, it doesn't work.
First, I did little patterns with this polish--just a stripe here or there to test it out.
Nothing.
I held it in front of a lamp. I held my hand in front of the window. I didn't use a top coat for fear it would keep the polish from working.
Nothing.
So I tested the bottle--it glows like a nightlight. I put on a second, all-over coat, thinking that maybe it just didn't get shaken up well enough the first time.
STILL nothing. I literally can't get this polish to glow when I am wearing it. Not even a glimmer.
On the bright side (no pun intended), it goes on clear so it didn't distort the color of my polish, just added shine. Even if it didn't work, I can still see potentially using it for a shine-on-matte stamping mani, though it would be a hundred times more awesome of the shiny parts GLOWED.
Grr.
Have you ever had this problem?
Monday, September 24, 2012
Swatch: Vivid
Last week I pulled a really old polish out of my drawer to use as an accent color, and it reminded me how much I loved the color. I thought I'd do some swatches to show you.
This is Sally Hansen Lacquer Shine in "Vivid." It's a very dark red shimmer--like crushed garnets in some light. It can almost take the appearance of a dark red layered over black, with a red shimmer on top.
I know I've said I'm not a big fan of shimmer polishes, but this is one polish that I make an exception for. Two, in fact, since it is the dreaded Sally Hansen, which I'd pretty much sworn of.
Other than the color, things I like about this polish: It can hold it's own after a single coat (I did two just for good measure, though). I also really like the brush, which is very long and thin. Normally I prefer a wider brush, like the one found in my Wet n Wild polish, but this one is nice, too.
This was the type of color that I wore in high school to annoy my mom. She had this rule about girls my age not wearing dark nail polishes because "They give the wrong impression." Around the age of sixteen, I just started ignoring that rule. After wearing this one once or twice, my mom asked to borrow it. After that, there were no rules about nail polish.
Did you have weird rules regarding polish use growing up?
Friday, September 14, 2012
Stamping Spam
Things have been a little rough around here lately. They're getting better, but last week was hard and I was pretty down. To cheer my room, my roommate picked me up a stamping kit that she found at Michaels, of all places.
I've been wanting to try stamping ever since I found out what it was, and I was so excited that I kind of tore apart the kit before taking photos.
The kit is by Salon Express, and includes a double ended stamper, a scraper, a rubber mat to hold the plate, and five plates. One of them has full tail designs, and the other four are decorative images. I think she said it was $10 (US).
I already had a background color on with another post in mind, but I decided to just stamp over it. For this manicure, I have Brash "Blue Dream" as a base, with Wet n'Wild "Metalica" for the ray design (top row, middle). For the flowers, I used Pure Ice "Touch Me Here."
Since this was my first stamping mani, it took a little getting used to the tool, figuring out the right motion to use to get a good stamp on my nail. As you can see on my thumb, the "full nail" images aren't quite wide enough for my nails--in face the only nail they give full coverage to is my pinky. It doesn't really matter which way I turn it--they either aren't wide enough, or aren't long enough, since my nails are naturally long, even when trimmed as short as I can get them.
And yes, the moon is sideways on purpose. Because I am a geek and just can't do crescent moons the way they are "supposed" to be.
The most recent one I did was this. Here I have Sally Hansen "Vivid" over Finger Paints "Tiffany Imposter" with a little butterfly in "Metallica" (can't tell that's one of my favorite polishes, can you? I also adore the look of shimmery/glittery/metallic polishes stamped on cremes).
It turns out that "Metallica" isn't quite as opaque as I'd hoped. It can handle one color in the background, but not two.
This kit has been a lot of fun to play around with, and if anything, it's made me one one of the nicer sets even more. I'll keep messing around with it and posting pictures so that you can see the various images that come in the set.
Thursday, September 6, 2012
Black Rainbow
This is the layering manicure I talked about on Wednesday. I wanted to play around with all of the polishes that I use only for layering, because they don't do well on their own.
To start with, I used put down one coat of Pure Ice "Touch Me Here." From pinky to thumb, I added one coat each of:
Essie "Sequin Sash"
Cover Girl 3-in-1 "Rose Quartz"
Maybelline Color Show "Plum Paradise"
Orly "Mysterious Curse"
Sally Hansen Hard as Nails Xtreme Wear "Night Lights"
For once, "Night Lights" gave a nice amount of coverage. Normally I would do two coats of that, but this time I could get away with one. Same with "Sequin Sash."
What are your favorite colors to layer? Any unexpected surprises?
Labels:
cover girl,
Essie,
layering,
Maybeline,
orly,
Sally Hansen,
swatches
Monday, July 16, 2012
Love & Hate
So we all know about my love affair with metallics and foils. I first fell for these polishes back in high school. I liked polish then, but I wasn't a polishaholic. I think I owned six: red, black, light pink, burgundy, blue metallic (the one from the above blog post), and black glitter.
I don't remember seeing a lot of metallics or foils then. Shimmers, glitters, sure. But a real metallic? Not so much. But then, I had a rather sheltered upbringing, so I could have missed out. And like I said, I wasn't obsessive back then.
Then I had about five years in college where I couldn't/wasn't allowed to wear polish. I moved four times a year (Yes, that equates to 20 moves in five years. Well, I guess it would be a little less, since there was a year we had an apartment, but still. It would be about 18), and never once brought a polish with me.
Fast forward to today, and I'm discovering all of the things that have come out while I was out of the loop, and finding stuff beyond what is available on the shelves of a small town Walmart.
And a lot of things that just weren't there the last time I looked.
Case in point: Wet n Wild "Metallica"

I picked this color up a few weeks ago to do accents for the Teen Titans manicure, and realized the other day that I had yet to swatch it on it's own. Curious, I sat down and did just that.
I love the formula of this polish. I hadn't tried Wet n Wild before (except for the bits and pieces that made it into that manicure), and I think I might have new go-to el cheapo polish, since our Walmart has stopped stocking Pure Ice in anything but pearly shimmers in pinks and neutrals.
The first coat goes on very sheer and streaky, but don't let that dissuade you! The second coat evens it out, and you could wear it with just two. I tried three, just to see if I could get it a little more intense, and I'm glad I did. Three coats gives full opacity, and there's not a streak in sight (any streaks you do see are actually from my top coat, which is the Sally Hansen Insta-Dri).
In shadows or ambient light, this polish reminds me of a silver alloy that has a copper base--just a slight pinkish tone to it. But put it in the sunlight and BAM, there is no doubt that this is metallic silver!
The one drawback I found is that it doesn't stand up very well to wear. I had tip wear almost immediately (this after just typing and some knitting), and it peeled off after 24 hours, with some pieces just flaking off in chunks like it couldn't get off the nail fast enough.
Overall, though, I love this polish, and I'm going to have to go back to Giant Eagle to see if they have more metallics in other colors.
For the accent nail, I used two coats of "Metallica" with two coats of Sally Hansen Hard as Nails Xteme Wear in "Night Lights." This is actually the glitter polish I bought all those years ago, and there is a very good reason that I haven't used it up in that time (though other than my clear coat and my Sally Hansen "Aquamarine Chrome" I think this has the biggest dent in it.)
This was the first part of the Xtreme Wear collection I ever purchased, and I should have listened to my initial feelings on it way back then and saved myself some trouble.
The polish consists of holographic microglitter suspended in a sheer, dark grey/black base. I did a lot of experimenting with this color in high school (I was a semi-goth chick with an obsession with things that sparkled), and I only ever found one use for this that I was happy with: 2 coats of "Night Lights" over two coats of Pure Ice "Touch Me Here." I tried wearing it on it's own and over every color I owned, and disliked every other combination.
On it's own, I just started layering. I think I got up to five coats before I gave up. It still wasn't at full opacity, the amount of glitter wasn't thrilling, and the background color turned a muddy, dull grey color that would be unflattering on just about everyone. In fact, more than two coats and it's just downright unsightly to my eye.

You can see that there's a LOT of glitter in the bottle. Now look at my ring finger. No, that's not a trick of the light. That's really how much glitter you get for two coats.
The only good things I can say about it are these: It dries faster than the other Xtreme wear colors I've tried, and it goes on evenly, which I can't say about them, either.
I have Xtreme Wear in three other colors: "White On," "Fuchsia Power," and "Sun Kissed." I bought "White On" first, because I needed a white. I know white is a notoriously hard color to work with, so when I had issues with the coverage and evenness of application, I was willing to dismiss it. I bought the other two at the same time, because I needed the colors and Target didn't have them in any other brands at the time. All three of them are thin, and should be used with a ridge filler. In addition, it takes at least three coats to get good, opaque, even coverage. They take forever to dry, except in the thinnest possible coats in which case they are "average" in my book, and out of all of my polishes, they are actually the most prone to flaking off!
You all know that sometimes I sound like a Sally Hansen ad around here, since that's what most of my polishes are. I like the Insta-Dri formula, but I hate the brushes. I've tried a Diamond Strength color in the past ("Diamonds and Rubies," which happens to be a dupe for the much cheaper Pure Ice "Siren", or vise versa, depending on how you look at it) and was underwhelmed. My favorite base/top coat has been discontinued, and the Insta-Dri top coat (which does not suffer from the funky brush issue, for some reason) tends to increase the propensity for peeling polish (yay, alliteration). I showed you one of their nail art pens, and you can see my thoughts on it over on my stash page (it's down at the bottom). Right now the only thing I've tried that they still currently make that I like is their cuticle pen (also near the bottom on the stash page), but I could probably skip that altogether and just use the Burt's Bees Lemon Butter. I've basically come to the conclusion that this will be a Sally-free blog from now on. I'll use up a couple of things--my top coats, and probably "Night Lights." But I want to replace "Fuchsia Power" and "Sun Kissed", and I am still on the hunt for a good white polish (right now I"m just using Maybelline Color Show "Porcelain Party", which is almost identical to "White On," except it dries slightly faster).
Do you guys even think it's worth swatching them? What do you do with disappointing polishes? Just pitch it?
I don't remember seeing a lot of metallics or foils then. Shimmers, glitters, sure. But a real metallic? Not so much. But then, I had a rather sheltered upbringing, so I could have missed out. And like I said, I wasn't obsessive back then.
Then I had about five years in college where I couldn't/wasn't allowed to wear polish. I moved four times a year (Yes, that equates to 20 moves in five years. Well, I guess it would be a little less, since there was a year we had an apartment, but still. It would be about 18), and never once brought a polish with me.
Fast forward to today, and I'm discovering all of the things that have come out while I was out of the loop, and finding stuff beyond what is available on the shelves of a small town Walmart.
And a lot of things that just weren't there the last time I looked.
Case in point: Wet n Wild "Metallica"
I picked this color up a few weeks ago to do accents for the Teen Titans manicure, and realized the other day that I had yet to swatch it on it's own. Curious, I sat down and did just that.
I love the formula of this polish. I hadn't tried Wet n Wild before (except for the bits and pieces that made it into that manicure), and I think I might have new go-to el cheapo polish, since our Walmart has stopped stocking Pure Ice in anything but pearly shimmers in pinks and neutrals.
The first coat goes on very sheer and streaky, but don't let that dissuade you! The second coat evens it out, and you could wear it with just two. I tried three, just to see if I could get it a little more intense, and I'm glad I did. Three coats gives full opacity, and there's not a streak in sight (any streaks you do see are actually from my top coat, which is the Sally Hansen Insta-Dri).
In shadows or ambient light, this polish reminds me of a silver alloy that has a copper base--just a slight pinkish tone to it. But put it in the sunlight and BAM, there is no doubt that this is metallic silver!
The one drawback I found is that it doesn't stand up very well to wear. I had tip wear almost immediately (this after just typing and some knitting), and it peeled off after 24 hours, with some pieces just flaking off in chunks like it couldn't get off the nail fast enough.
Overall, though, I love this polish, and I'm going to have to go back to Giant Eagle to see if they have more metallics in other colors.
For the accent nail, I used two coats of "Metallica" with two coats of Sally Hansen Hard as Nails Xteme Wear in "Night Lights." This is actually the glitter polish I bought all those years ago, and there is a very good reason that I haven't used it up in that time (though other than my clear coat and my Sally Hansen "Aquamarine Chrome" I think this has the biggest dent in it.)
This was the first part of the Xtreme Wear collection I ever purchased, and I should have listened to my initial feelings on it way back then and saved myself some trouble.
The polish consists of holographic microglitter suspended in a sheer, dark grey/black base. I did a lot of experimenting with this color in high school (I was a semi-goth chick with an obsession with things that sparkled), and I only ever found one use for this that I was happy with: 2 coats of "Night Lights" over two coats of Pure Ice "Touch Me Here." I tried wearing it on it's own and over every color I owned, and disliked every other combination.
On it's own, I just started layering. I think I got up to five coats before I gave up. It still wasn't at full opacity, the amount of glitter wasn't thrilling, and the background color turned a muddy, dull grey color that would be unflattering on just about everyone. In fact, more than two coats and it's just downright unsightly to my eye.
You can see that there's a LOT of glitter in the bottle. Now look at my ring finger. No, that's not a trick of the light. That's really how much glitter you get for two coats.
The only good things I can say about it are these: It dries faster than the other Xtreme wear colors I've tried, and it goes on evenly, which I can't say about them, either.
I have Xtreme Wear in three other colors: "White On," "Fuchsia Power," and "Sun Kissed." I bought "White On" first, because I needed a white. I know white is a notoriously hard color to work with, so when I had issues with the coverage and evenness of application, I was willing to dismiss it. I bought the other two at the same time, because I needed the colors and Target didn't have them in any other brands at the time. All three of them are thin, and should be used with a ridge filler. In addition, it takes at least three coats to get good, opaque, even coverage. They take forever to dry, except in the thinnest possible coats in which case they are "average" in my book, and out of all of my polishes, they are actually the most prone to flaking off!
You all know that sometimes I sound like a Sally Hansen ad around here, since that's what most of my polishes are. I like the Insta-Dri formula, but I hate the brushes. I've tried a Diamond Strength color in the past ("Diamonds and Rubies," which happens to be a dupe for the much cheaper Pure Ice "Siren", or vise versa, depending on how you look at it) and was underwhelmed. My favorite base/top coat has been discontinued, and the Insta-Dri top coat (which does not suffer from the funky brush issue, for some reason) tends to increase the propensity for peeling polish (yay, alliteration). I showed you one of their nail art pens, and you can see my thoughts on it over on my stash page (it's down at the bottom). Right now the only thing I've tried that they still currently make that I like is their cuticle pen (also near the bottom on the stash page), but I could probably skip that altogether and just use the Burt's Bees Lemon Butter. I've basically come to the conclusion that this will be a Sally-free blog from now on. I'll use up a couple of things--my top coats, and probably "Night Lights." But I want to replace "Fuchsia Power" and "Sun Kissed", and I am still on the hunt for a good white polish (right now I"m just using Maybelline Color Show "Porcelain Party", which is almost identical to "White On," except it dries slightly faster).
Do you guys even think it's worth swatching them? What do you do with disappointing polishes? Just pitch it?
Tuesday, July 10, 2012
Down the Yellow Brick Road
Well, not quite.
Today I have a couple of swatches for you by China Glaze: "Ruby Pumps" and "Dorothy Who?"
These are very similar: Sheer bases in primary colors, with loads of silver micro glitter.
They sparkle. Their names reference of of my favorite movies. And they go on like a dream. What's not to love? [ETA: all shots in this post are taken WITH a top coat. The glitter is great, but has an uneven texture. Adding a clear topcoat really makes it shine.]
First, we have "Ruby Pumps."

This is a bold, primary red. It's probably the closest thing to a true red I have in my collection (albeit it is a small one). A single coat goes on slightly pinkish. A second coat evens it out, and a third makes it just a bit darker--though in general it's not noticeable.
This shot shows the color the best, even though you can hardly see the glitter. As far as glitter polishes go, this one is pretty subtle on first glance.
For these swatches, I used three coats on every finger except my ring finger, where I have two coats over Pure Ice "Siren," just so you can see the transparency. With thicker coats, you can't really tell the difference between this color on it's own and when it's used with a base coat. Those thicker coats take forever to dry, however (30+ minutes, at least, with an hour being preferable). Thinner coats will retain transparency, though it's not obvious in these photos.

Want a really cool effect? Apply three coats of this color, then dip a q-tip in polish remover and lightly drag it over your nail, just removing the topmost layer of color to reveal the silver glitter. It looks really cool and I wish I'd discovered it before I banged up this manicure and took it off. Next time, maybe.

For "Dorothy Who" I used the same technique: 3 coats on every nail except my ring finger, where I used a base of Sally Hansen Insta-Dri "Blue By." Once again, the difference is almost unnoticeable in the photograph, and even in real life it is quite subtle.

This is a very bright blue, almost peacock blue and very attractive to my eye. The glitter is the same as in "Ruby Pumps," but unlike in the red, the glitter actually shows up as being silver in this polish, and is much more eye catching. Once again, it's loaded with the stuff, and while the polish starts out sheer it only takes 2-3 coats to build up a decent amount of opacity.
I do need to apologize; my camera does not like shiny, sparkly, or bright things. The most accurate color representation of this polish is on my middle finger in this shot. The others are far too turquoise-y.
I wore "Ruby Pumps" for three days under somewhat trying conditions (extreme heat, physical activity) and it suffered only a bit of tip wear. While it's easy to damage these colors in the drying phase, once they're on they hold up really well. "Dorothy Who" seemed to dry a bit quicker, but I think I also used slightly thinner coats on that one.

Overall, I love the colors and the formulas, and you'll probably be seeing a lot more of them here, both on their own and layered over other colors.
Today I have a couple of swatches for you by China Glaze: "Ruby Pumps" and "Dorothy Who?"
These are very similar: Sheer bases in primary colors, with loads of silver micro glitter.
They sparkle. Their names reference of of my favorite movies. And they go on like a dream. What's not to love? [ETA: all shots in this post are taken WITH a top coat. The glitter is great, but has an uneven texture. Adding a clear topcoat really makes it shine.]
First, we have "Ruby Pumps."
This is a bold, primary red. It's probably the closest thing to a true red I have in my collection (albeit it is a small one). A single coat goes on slightly pinkish. A second coat evens it out, and a third makes it just a bit darker--though in general it's not noticeable.
For these swatches, I used three coats on every finger except my ring finger, where I have two coats over Pure Ice "Siren," just so you can see the transparency. With thicker coats, you can't really tell the difference between this color on it's own and when it's used with a base coat. Those thicker coats take forever to dry, however (30+ minutes, at least, with an hour being preferable). Thinner coats will retain transparency, though it's not obvious in these photos.
Want a really cool effect? Apply three coats of this color, then dip a q-tip in polish remover and lightly drag it over your nail, just removing the topmost layer of color to reveal the silver glitter. It looks really cool and I wish I'd discovered it before I banged up this manicure and took it off. Next time, maybe.
For "Dorothy Who" I used the same technique: 3 coats on every nail except my ring finger, where I used a base of Sally Hansen Insta-Dri "Blue By." Once again, the difference is almost unnoticeable in the photograph, and even in real life it is quite subtle.
This is a very bright blue, almost peacock blue and very attractive to my eye. The glitter is the same as in "Ruby Pumps," but unlike in the red, the glitter actually shows up as being silver in this polish, and is much more eye catching. Once again, it's loaded with the stuff, and while the polish starts out sheer it only takes 2-3 coats to build up a decent amount of opacity.
I wore "Ruby Pumps" for three days under somewhat trying conditions (extreme heat, physical activity) and it suffered only a bit of tip wear. While it's easy to damage these colors in the drying phase, once they're on they hold up really well. "Dorothy Who" seemed to dry a bit quicker, but I think I also used slightly thinner coats on that one.
Overall, I love the colors and the formulas, and you'll probably be seeing a lot more of them here, both on their own and layered over other colors.
Saturday, July 7, 2012
Summer Fun: Palm Trees, or, The Bad Day Manicure
I love palm trees and all things tropical. I collect flamingos. Up until last year my Christmas tree was a seven foot light up palm tree normally seen on kitchy front porches that I dangled sea shells and glass flamingos from.
So it was kind of a surprise that I didn't know what to do for this manicure.
In the end, I decided to swipe the silhouette at sunset look that I've been seeing around the blogosphere and on Deviantart.


I was just about to put my top coat on this, when I kind of freaked.
There were ants in my bed.
I'm a pretty tidy person. I'm not a neat freak, and sure, we have dishes in our sink from time to time. But I don't store food in my room and I try to vacuum at least semi-regularly.
Now let me preface this: earlier this week, I found some ants in the seams of the linoleum. Not in the kitchen, mind you.
In my bathroom.
So I promptly washed the bath mat, swept the floor, wiped the whole thing down with Clorox, and, at the advice of my mom, started spraying the baseboards and the floor with a 50/50 vinegar/water mix.
As of this morning, I thought they were mostly gone. I still spotted one or two, but dispatched them in short order.
Then I picked up my laptop to start this blog post, and found half a dozen on the keyboard and screen.
They were on the sheets.
They were climbing up the wall.
They were in my damn bed.
If that's not an invasion of privacy, I don't know what is.
So, instead of photographing my mani and writing out a nice, detailed blog post, my roommate and I pulled all of the furniture away from the wall, swept, sprayed the vingar mix on the baseboards and along the edge of the carpet, and then set it all back up. Four times. Because I have my bed on stilts for extra storage, and it kept falling off for some reason.
And it's hot. It's bloody hot, even with the A/C running.
During one of the falls, my mattress knocked the plug for my alarm clock out of the wall, cracking the plate cover in the process.
And then the full glass of water on my night stand was knocked off and spilled all over everything.
And did I mention that my mac mini also got knocked off my makeshift desk in the process? (Appears undamaged, so far.)
So once I got everything back in place, I went to take my manicure pictures, only to discover that it had been chipped an damaged during all of the hullabaloo. I thought briefly about starting over, but...
You know what? It's a manicure. The Polish Police aren't going to come after me for posting pictures of a sloppy or damaged mani (that I also forgot to do clean up work on).
While I like the way it came out (pre-damage), the colors just aren't really me, so I was thinking of taking it off anyway.
And since it's that kind of a day, I decided to just do a straight up swatchy mani. This is a new polish I got the other day at the Sally's sale. It's my first Orly polish, and I found it on clearance. I love the colors.

So it was kind of a surprise that I didn't know what to do for this manicure.
In the end, I decided to swipe the silhouette at sunset look that I've been seeing around the blogosphere and on Deviantart.
Colors used: Two coats Maybelline Color Show "Porcelain Party;" two coats Color Zone florescent pink; sponged application of Sally Hansen Xtreme Wear "Sun Kissed;" sponged application of Sally Hansen Insta-Dri "Lightening;" freehand design in Pop Beauty "Black."
I was just about to put my top coat on this, when I kind of freaked.
There were ants in my bed.
I'm a pretty tidy person. I'm not a neat freak, and sure, we have dishes in our sink from time to time. But I don't store food in my room and I try to vacuum at least semi-regularly.
Now let me preface this: earlier this week, I found some ants in the seams of the linoleum. Not in the kitchen, mind you.
In my bathroom.
So I promptly washed the bath mat, swept the floor, wiped the whole thing down with Clorox, and, at the advice of my mom, started spraying the baseboards and the floor with a 50/50 vinegar/water mix.
As of this morning, I thought they were mostly gone. I still spotted one or two, but dispatched them in short order.
Then I picked up my laptop to start this blog post, and found half a dozen on the keyboard and screen.
They were on the sheets.
They were climbing up the wall.
They were in my damn bed.
If that's not an invasion of privacy, I don't know what is.
So, instead of photographing my mani and writing out a nice, detailed blog post, my roommate and I pulled all of the furniture away from the wall, swept, sprayed the vingar mix on the baseboards and along the edge of the carpet, and then set it all back up. Four times. Because I have my bed on stilts for extra storage, and it kept falling off for some reason.
And it's hot. It's bloody hot, even with the A/C running.
During one of the falls, my mattress knocked the plug for my alarm clock out of the wall, cracking the plate cover in the process.
And then the full glass of water on my night stand was knocked off and spilled all over everything.
And did I mention that my mac mini also got knocked off my makeshift desk in the process? (Appears undamaged, so far.)
So once I got everything back in place, I went to take my manicure pictures, only to discover that it had been chipped an damaged during all of the hullabaloo. I thought briefly about starting over, but...
You know what? It's a manicure. The Polish Police aren't going to come after me for posting pictures of a sloppy or damaged mani (that I also forgot to do clean up work on).
While I like the way it came out (pre-damage), the colors just aren't really me, so I was thinking of taking it off anyway.
And since it's that kind of a day, I decided to just do a straight up swatchy mani. This is a new polish I got the other day at the Sally's sale. It's my first Orly polish, and I found it on clearance. I love the colors.
Orly "Mysterious Curse" $3.99 at Sally's.
This polish is a sheer, plum colored base with bright turquoise sparkles in it. It reminds me a lot of another favorite polish I had in high school--"hologlam," which was a Mary Kay color. I used it on it's own and layered it over every color I owned, and I think that this polish might suit better layered over a blue or black.

Shortly after these pictures were taken, I discovered that the airport card on my laptop is officially toast, and managed to scratch the polish on four of my nails in an unrelated incident.
It's just that kind of day.
Shortly after these pictures were taken, I discovered that the airport card on my laptop is officially toast, and managed to scratch the polish on four of my nails in an unrelated incident.
It's just that kind of day.
Labels:
art nails,
challenge,
Color Zone,
manicure,
manicures,
nail art,
nails,
orly,
Sally Hansen,
Sally's,
summer fun,
swatches
Monday, July 2, 2012
Nothing Shines Like Chrome
Back in high school, I had a favorite nail polish. It was turquoise, metallic, and dried super fast--all my favorite things in a polish.
I wore it a lot back then, but then I got into art school, and if I wasn't covered in acrylic and oil from painting class, then I was stripping it off with the acetone in printmaking. And my nails looked like crap anyway thanks to sculpture.
During my post grad work, I wasn't allowed to wear nail polish--in equal parts because of the chemicals and also because my hands showed up in a lot of photos, and it was unprofessional to have brilliantly hued nails when the focus should be on 2,000 year old ceramic jars.
This week I pulled this favorite polish of retirement for the first time in six years. To be honest, I'd forgotten about it for a while, and then I got distracted by challenges. I wish I'd used it sooner, though, because my beloved Sally Hansen Chrome Nail Makeup in #13 Aquamarine Chrome is on it's last legs. It's starting to dry out and the formula that went on so easily and covered perfectly in 2 coats is now thick and clumpy, and barely goes on at all.
I guess it doesn't matter much, since the bottle is almost empty.
Here's a shot with a top coat. It doesn't make a huge amount of difference in the photos, but it turns it from a "dry" shine to a "wet" one, if that makes any sense.
Some people have their cremes, or jellies, or glitters that they go crazy for. But for me, it's always been about the foils.
When it comes to cars or nails, my favorite color is chrome.
Thursday, June 14, 2012
Heroes vs Villains #2: The Rogue and the Celtic Sun
The X-Men cartoon premiered in 1992, when I was five years old. Searching for reference shots for this week's challenge, I started watching it again on Netflix, and oh my god. This explains so much about me. The propensity for quoting things, the "accept everyone" attitude--and my love of strong female heroines, leather jackets, multi-color hair, hip belts that have better things to do than hold up your pants, and knee high boots.
It's that later bit that inspired this manicure: Rogue.
(I'm so glad my nails aren't magnified like that in real life. They look so much neater when they aren't two inches from your face.)
For this one, I used three coats of China Glaze "Celtic Sun" for a base (more on that in a minute), and Sinful Colors Professional in #946 Happy Ending (x2) for the green stripes. For the black accents I used my black Claire's Nail Art Pen. For the accent nail, I used Pure Ice "Siren" with a streak of Sally Hansen Hard as Nails Xtreme Wear in #300 White On. I topped it all off with Sally Hansen Insta-Dri Anti-Chip Top Coat, and can I just say, it's my new favorite top coat?
I think Rogue and Mystique make great foils for this challenge, since Mystique was once Rogue's foster mother (at least in the mythology of the original cartoon. With all of the revamps that have happened in the last twenty years, I don't know if this is still true).
This was my first real introduction to comics, and I really feel that the X-Men story is one that we need right now--the message that no matter what our differences are, we can still live together in peace, and that a little tolerance can go a long way.
This was my first time trying anything by China Glaze. Here you can see my nails before I added the accents:

That's two coats of Siren and three of Celtic Sun. My camera doesn't like bright things very much, so it really doesn't show that this is a highlighter yellow. It's also very sheer, even with three layers, and I had some trouble applying it. It was difficult to get an even coat, and when the brush passed over a previously painted area there was an issue of balding. I'm glad I used it as a base, since covering it with the green made the unevenness less noticeable. I think this is another color that would benefit from having a white basecoat.
I also had some issues with the brush. One of the strands hadn't been cut, so I had to do that myself.
I know that everyone else really seems to love these summer florescent, but so far I'm not crazy about them. I guess I'm more into the dark, iridescent colors, and those are the textures I tend to go for.
It's that later bit that inspired this manicure: Rogue.
For this one, I used three coats of China Glaze "Celtic Sun" for a base (more on that in a minute), and Sinful Colors Professional in #946 Happy Ending (x2) for the green stripes. For the black accents I used my black Claire's Nail Art Pen. For the accent nail, I used Pure Ice "Siren" with a streak of Sally Hansen Hard as Nails Xtreme Wear in #300 White On. I topped it all off with Sally Hansen Insta-Dri Anti-Chip Top Coat, and can I just say, it's my new favorite top coat?
I think Rogue and Mystique make great foils for this challenge, since Mystique was once Rogue's foster mother (at least in the mythology of the original cartoon. With all of the revamps that have happened in the last twenty years, I don't know if this is still true).
This was my first real introduction to comics, and I really feel that the X-Men story is one that we need right now--the message that no matter what our differences are, we can still live together in peace, and that a little tolerance can go a long way.
This was my first time trying anything by China Glaze. Here you can see my nails before I added the accents:
That's two coats of Siren and three of Celtic Sun. My camera doesn't like bright things very much, so it really doesn't show that this is a highlighter yellow. It's also very sheer, even with three layers, and I had some trouble applying it. It was difficult to get an even coat, and when the brush passed over a previously painted area there was an issue of balding. I'm glad I used it as a base, since covering it with the green made the unevenness less noticeable. I think this is another color that would benefit from having a white basecoat.
I also had some issues with the brush. One of the strands hadn't been cut, so I had to do that myself.
I know that everyone else really seems to love these summer florescent, but so far I'm not crazy about them. I guess I'm more into the dark, iridescent colors, and those are the textures I tend to go for.
Monday, June 11, 2012
Inspriation Shots
I'm still so new to this world of fashion blogging, I feel like there are about a million years worth of posts that I need to get caught up on. I think I've added over a dozen blogs to my RSS reader in the past two days, and I keep searching for more.
I think the one that finally tipped me over the edge and got me blogging about nail art myself was Let Them Have Polish's China Glaze florescent watermarble. I don't even like neons in any form, be it clothing, polish, I'm not even that crazy about highlighters most of the time. But the pink and yellow in that one just made me squee and I HAD to try it.
Looking at the different blogs, there are so many things I want to try. I have a textile-themed manicure planned for some point in the future (after that water marble and a couple of comic/manga themed ones I want to do), and Nails in Nippon's tweed pattern would be perfect for that. I love the elegance of Copy That, Copy Cat's gloss-on-black manicure. I'm just stunned by some of her freehand designs, too!
Lastly, I'm saving the Morning Java swatch from Polish Insomniac. I love the color and when I finally figure out the steampunk manicure that I want to do (but have yet to design) I think that color is going to be involved. Its just perfect!
I think the one that finally tipped me over the edge and got me blogging about nail art myself was Let Them Have Polish's China Glaze florescent watermarble. I don't even like neons in any form, be it clothing, polish, I'm not even that crazy about highlighters most of the time. But the pink and yellow in that one just made me squee and I HAD to try it.
Looking at the different blogs, there are so many things I want to try. I have a textile-themed manicure planned for some point in the future (after that water marble and a couple of comic/manga themed ones I want to do), and Nails in Nippon's tweed pattern would be perfect for that. I love the elegance of Copy That, Copy Cat's gloss-on-black manicure. I'm just stunned by some of her freehand designs, too!
Lastly, I'm saving the Morning Java swatch from Polish Insomniac. I love the color and when I finally figure out the steampunk manicure that I want to do (but have yet to design) I think that color is going to be involved. Its just perfect!
Sunday, June 10, 2012
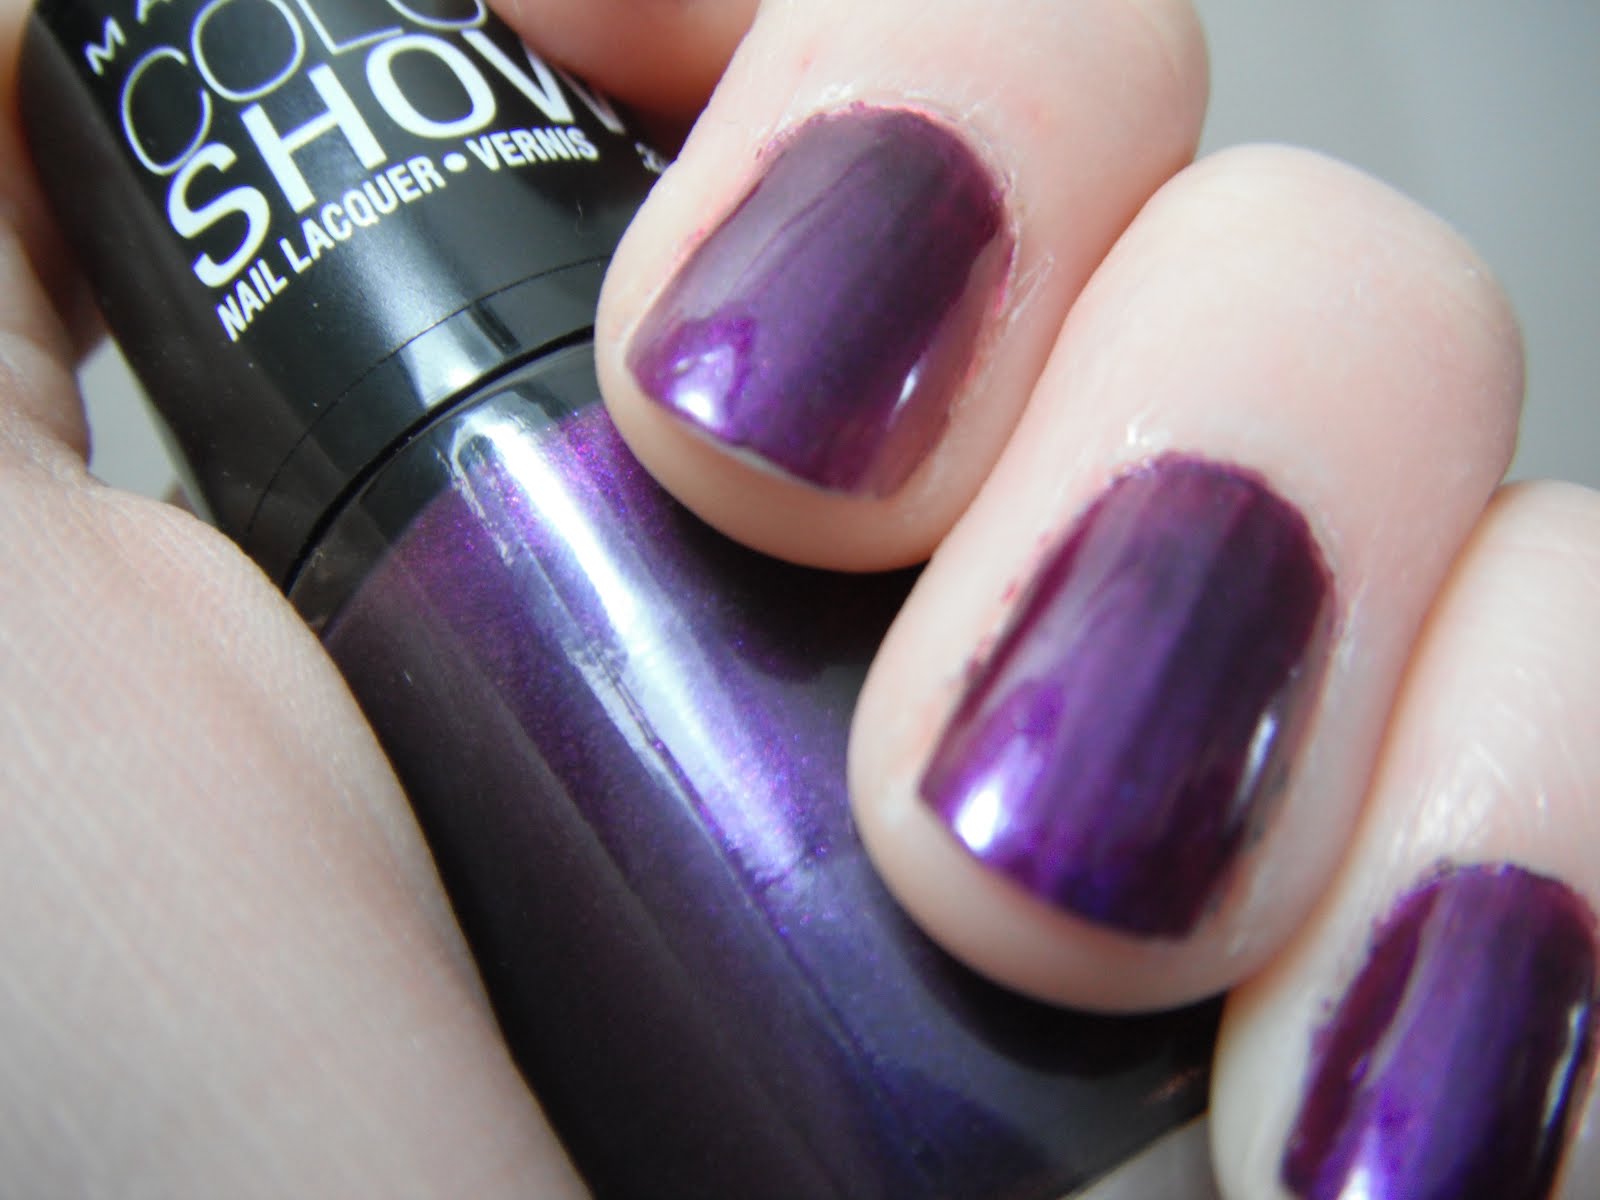
Maybelline Color Show #280 Plum Paradise
Size: .23 fl oz/7 ml
Price: $2.89
Source: Walmart

This was a splurge I picked up because I didn't really have any purple in my stash, and I wear a lot of it. I believe that this was on clearance, but it was just kind of tossed in an unmarked bin.
The color is a rich, pearly, royal purple that I love. When it comes to applying it, however, it's a bit of a challenge. For the first coat, I tried to go really thin -- well, that left lots of horrible streaks, and passing over an area that was already painted even a few seconds later was a big mistake. I discovered on the second coat that the best option was to glop it on a bit thicker and then spread it out as quickly as possible.
It does dry quickly, which is a plus, and there's a lot of shine to it. I used 3 coats for these swatches.
I think that Plum Paradise would do better layered with something else--over a black or white, for example. White would really brighten it up and add a whole new dimension to the color, but it would probably also make the uneven application even more noticeable.
I wore this color for a day and a half, but even for that short of a time this color didn't really hold up. By the time I took it off, it was showing tip wear on almost every nail (and that's with both a base and a top coat), some of the nails had gouges in the color. It seems that this polish is very soft, even when dry, and just my daily routine left nicks and scratches in the color.
Over all, I'm not impressed. I might continue to use this color (as I said, layered over something else, and probably with two coats of top coat, just to be safe), but I really wouldn't purchase it again and I'm glad I paid less than $3 for it.
Price: $2.89
Source: Walmart
This was a splurge I picked up because I didn't really have any purple in my stash, and I wear a lot of it. I believe that this was on clearance, but it was just kind of tossed in an unmarked bin.
The color is a rich, pearly, royal purple that I love. When it comes to applying it, however, it's a bit of a challenge. For the first coat, I tried to go really thin -- well, that left lots of horrible streaks, and passing over an area that was already painted even a few seconds later was a big mistake. I discovered on the second coat that the best option was to glop it on a bit thicker and then spread it out as quickly as possible.
It does dry quickly, which is a plus, and there's a lot of shine to it. I used 3 coats for these swatches.
I think that Plum Paradise would do better layered with something else--over a black or white, for example. White would really brighten it up and add a whole new dimension to the color, but it would probably also make the uneven application even more noticeable.
Over all, I'm not impressed. I might continue to use this color (as I said, layered over something else, and probably with two coats of top coat, just to be safe), but I really wouldn't purchase it again and I'm glad I paid less than $3 for it.
Subscribe to:
Posts (Atom)