Showing posts with label review. Show all posts

Monday, October 8, 2012

I Got Distracted

I was going to show you pictures of the Salon Effects I bought last week, but before I even opened the boxes, I came across this at Target:

Sinful Colors Sinfully Magnetic "Captivate Me." 

I love the color. It's a great pinky-purple that fits well with my wardrobe. Between the shimmer and the magnetic effect, this color has so much depth, it's almost holographic, with the image seeming to move in different light or from different angles. 

I'm not really sure why, but my left pinky wouldn't take the pattern. You can see the beginnings of it there near the cuticle, but that's as much as I got. 

The Sinful colors uses a ring magnet, which made it easy to hang on to and I didn't have to mess with setting it down and picking it back up again in between nails. I did notice that the pattern didn't take quite as well on some of my nails. It kind of looks like there's a lense flare or something, just a big blank patch. I assume this has to do with the shape of my nails and that section being too close or too far from the magnet, but I can't be sure. 
On it's own, I love the color and it coves well in only one coat. I can see using it by itself (without the magnet). I also really liked some of the other colors in the collection, and would like to get more of them--and at only $4.99 each (versus $9.99 for the Sally Hansen version, and we all know how I feel about SH) I'll probably end up with at least 3-4 more, if not the whole collection.
 

Monday, October 1, 2012

Dud


 My weekend manicure was a little bit of a change for me. I decided to use the unnamed pinky-purple Color Zone polish. If you remember, this came from a neon kit I acquired some time ago, and quickly decided I didn't like the neon pink or the clear glitter that came with it, so it was several weeks before I even tried this polish.

 Despite how poorly the bright pink preformed, I really like the way this one came out. Next to the pink, I would have called it purple, but as you can see that isn't really the case. It does have some glitter in it, but mostly it shows up as a texture rather than shine. Still, I love the color and I kept looking at it at work.
I was a little disapointed in this manicure, because I wasn't just test driving the Color Zone, but a Wet n Wild polish I picked up at Giant Eagle (more on that this Friday).

I thought, hey, it's $1.99 Wet n Wild. I like them. And I've been wanting a glow in the dark, Plus, cute tombstone bottle. What could go wrong? 

Turns out, it doesn't work. 

First, I did little patterns with this polish--just a stripe here or there to test it out.

Nothing. 

I held it in front of a lamp. I held my hand in front of the window. I didn't use a top coat for fear it would keep the polish from working. 

Nothing. 

So I tested the bottle--it glows like a nightlight. I put on a second, all-over coat, thinking that maybe it just didn't get shaken up well enough the first time.

STILL nothing. I literally can't get this polish to glow when I am wearing it. Not even a glimmer.

On the bright side (no pun intended), it goes on clear so it didn't distort the color of my polish, just added shine. Even if it didn't work, I can still see potentially using it for a shine-on-matte stamping mani, though it would be a hundred times more awesome of the shiny parts GLOWED. 

Grr. 

Have you ever had this problem? 

Friday, September 21, 2012

My new favorite base coat

Where has this week gone? I haven't had any time for nail art, it seems.

I've also kind of been avoiding blogger, since they finally did away with the old dashboard layout. I'm not crazy about the new one, but they seem to have made SOME improvements since I tried it when it first rolled out earlier this year.

But that is neither here nor there, and you're here for the nails, aren't you?

 Doesn't look so interesting, does it?

That right there is Essie "Grow Stronger." Pretty much since I started this blog, I've been talking about how bad my nails are peeling. I've had bouts with peeling nails on and off for years, but this had been, by far, the worst, most stubborn case of it I've ever had, and resulted in me trimming my nails way back.

The above shot shows my let hand (the better of the two) with one coat of Grow Stronger. On the package, it says that you can see results in five days, and you certainly can. I've worn this every day for three weeks, and have seen a vast improvement. Unfortunately, my line of work keeps undoing all of that progress, but I know that it keeps happening, and I know that my nails would be much worse without it.


Here you can see my right hand--the worse off of the two--before the base coat. Let me reitterate: This is what my nails look like after improvement. I did have tears that went at least a quarter of the way down my nails.

Every time I get to that point of almost, almost--I bang my hand or tear a nail or something gets stuck and I have to use my nails to pry something open, and then they get torn up again. But between constant moisturizing and this base, my nails are noticeably stronger (even when completely bare) and growing much more quickly. I think that once the stained bits grow out, I should be back to healthy, strong nails. Anyway, that's my theory and I'm sticking to it.

Grow Stronger is a pale pink in the bottle, but goes on clear. I did experiment, and after three coats you can kind of see a bit of milky color, but there really isn't enough to show up or affect a polish color.

Even if you don't have a bad case of the peelies, I would recommend this for anyone with weak nails, or who would like to grow them longer. I noticed that my manicures lasted on average 1-2 days longer with minimal damage--which is one reason why I don't have nail art today. I'm loath to take off my polish until it starts to chip (the slightest chip, however, and all bets are off!).

Essie Grow Stronger is $8, and you can find it anywhere Essie is sold. I got mine from Giant Eagle, but I have also seen it at Target and I think at Walmart.

Friday, September 14, 2012

Stamping Spam


Things have been a little rough around here lately. They're getting better, but last week was hard and I was pretty down. To cheer my room, my roommate picked me up a stamping kit that she found at Michaels, of all places.

I've been wanting to try stamping ever since I found out what it was, and I was so excited that I kind of tore apart the kit before taking photos.

The kit is by Salon Express, and includes a double ended stamper, a scraper, a rubber mat to hold the plate, and five plates. One of them has full tail designs, and the other four are decorative images. I think she said it was $10 (US).


I already had a background color on with another post in mind, but I decided to just stamp over it. For this manicure, I have Brash "Blue Dream" as a base, with Wet n'Wild "Metalica" for the ray design (top row, middle). For the flowers, I used Pure Ice "Touch Me Here."

Since this was my first stamping mani, it took a little getting used to the tool, figuring out the right motion to use to get a good stamp on my nail. As you can see on my thumb, the "full nail" images aren't quite wide enough for my nails--in face the only nail they give full coverage to is my pinky. It doesn't really matter which way I turn it--they either aren't wide enough, or aren't long enough, since my nails are naturally long, even when trimmed as short as I can get them.
Kind of disappointing, but I wasn't super thrilled by some of the patterns, anyway. I can do dots, I've done flowers, and I'm not really a big fan of animal print. The stars, however, got to me. That was the first thing I wanted to do, but my polish was the wrong color for what I had in mind. So I faffed around a bit and when I changed manis, I laid out the base for this:

While the star pattern came out fairly clear on the nail, once again you can tell that the pattern isn't large enough to actually cover the nail, and the edges came out kind of rough. I'm sure this had as much to do with my amateur technique as it did with the fact that this is a cheap kit.
One of the individual patterns was a moon and stars. I knew I had to do that one. I used the same colors for all my nails ("Metallica" again, with Revlon's "Mysterious") but obviously the two solid coats on my ring finger are much darker than it came out as a stamp over silver.

And yes, the moon is sideways on purpose. Because I am a geek and just can't do crescent moons the way they are "supposed" to be.
All of these manicures are pretty messy, since I was just playing around with them. Sorry. They were more for practice than aesthetics.


The most recent one I did was this. Here I have Sally Hansen "Vivid" over Finger Paints "Tiffany Imposter" with a little butterfly in "Metallica" (can't tell that's one of my favorite polishes, can you? I also adore the look of shimmery/glittery/metallic polishes stamped on cremes).
It turns out that "Metallica" isn't quite as opaque as I'd hoped. It can handle one color in the background, but not two.
I actually wore this one for a couple of days before I remembered to get photos of it. (Bad blogger! No cookie!) I'm still trying to determine if some of the issues I'm having are my technique, my polish, or the kit itself. Overall the images are printing pretty clear, but not always in their entirety, and sometimes I'll have extra polish around the image, which probably comes down to me not scraping it enough.

This kit has been a lot of fun to play around with, and if anything, it's made me one one of the nicer sets even more. I'll keep messing around with it and posting pictures so that you can see the various images that come in the set.

Monday, September 10, 2012

Tips & Toes

A few weeks ago, I shared a bit of a haul, including this:

Burt's Bees Tips & Toes kit, $12.97, Walmart.

Let's take a closer look:
Left to Right:
Chapstick
Honey and Grapeseed oil hand cream
Coconut Foot cream
Lemon Butter cuticle cream
Almond Milk beeswax hand cream
Hand Salve

Considering a jar of the Lemon butter is $5.99, and the kit was $13, I think this is a pretty good deal, even if everything here is sample sized instead of full size.

I won't talk about the Lemon Butter this time around, since I already waxed poetic about it here, and I didn't use the chapstick. I've tried the Burt's Bees chapstick and lip tints in the past, and I just didn't care for them (I'm picky about my chapstick. I prefer lipgloss).

That leaves us with four products, and all of them smell good enough to eat.

Burt's Bees Thoroughly Theraputic Honey and Grapeseed Oil Hand Cream (20g/.75 oz)
This is a very thick lotion, and a little goes a long way--just a pea-sized dollop or smaller. It smells very nice, but I thought the honey scent was a little strong, especially the first time I used it. After a while, though, I got used to it and it didn't bother me.

It moisturizes very well, but there is a little bit of a residue when first applied. Like the smell, however, it eventually fades and I actually thought it felt better than many lotions I've tried in the past.

When I use it, I like to rub it in first around my cuticles and the tips of my fingers. It helped so much with my dry, peeling skin!

My biggest complaint is actually that the tube seems to be filled with more air than product, which means that I'll squeeze and squeeze and squeeze, getting nothing, and then all of a sudden three times more than I need will glop out at once. So make sure you have a friend handy to share with. :)

Verdict: Will buy again.

Burt's Bees Coconut Foot Cream (20g/.75 oz)

This stuff smells soooo good. I love it.

I've mentioned before how dry and awful my feet are. Sometimes I'm not sure if they're worse in the winter, when it's so dry out, or in the summer, when I'm constantly running around barefoot or in sandals.

The instructions on the tube say to apply it before bed and wear cotton socks, but it's been too hot lately to sleep with socks on. I just rubbed it in and went to bed, tucking my feet under the covers. I've also applied it before work when wearing shoes and socks, and miraculously have come home with feet that feel better than when I left in the morning. With regular use, the rough, nasty patches of skin are almost completely gone. I still have patches of dry skin, but not nearly as bad or as bothersome as before.

The results weren't quite as dramatic as the time I used the Lemon Butter on them. But they were still a lot softer and felt better than they have in a really long time.

This tube had the same problem with extra air that the hand cream did, but because it's a thinner formula, it was easier to control.

Verdict: Will probably repurchase.

Burt's Bees Almond Milk Beeswax Hand Cream (7g/.25 oz)


This is one of the ones I was most looking forward to in the kit. It just sounded luscious, and I love the little glass pot (actually, I love all of the BB packaging. The box was recyclable, the tins are so vintage and cute, and the jar is perfect for storing things like stitch markers, or homemade makeup, or glitter or rhinestones for nail art).

It takes a surprisingly small amount to get a good application, and I got quite a few uses out of the tiny jar. It smells like fresh almond cookies, which is amazing, but makes me want to nom on my hands a little. It hydrates really well. There is a little bit of a greasy film leftover, but like with everything else, it fades rather quickly. I like applying this best right before bed, just after I've done my nails to rehydrate after using the polish remover.

Verdict: will definitely buy again.

Burt's Bees Hand Salve (8.5g/.3 oz)
Between the lotion, the cuticle cream, and the hand cream, I wasn't really sure what the purpose of the hand salve was. Surely you can only apply so much moisture to your skin before it just stops having an effect, right?

While that might be true, my first introduction to this was actually because of an allergic reaction. I had a really itchy spot on my skin that was swollen and not looking so good, so my roommate grabbed her (giant) tin and smeared some on. It didn't have an instant effect, but it did help with the itchiness, swelling, and redness (along with advil and benadryl). I still don't know what caused the reaction in the first place, but I do know that it wasn't Burt's--which makes it a rarity and plants it firmly at the top of my list of favorite brands.

Like many of the Burt's Bees products, this does leave a greasy residue, and in this case, it lasts much longer than any of the others. Honestly, I wouldn't use it on my hands unless I had a problem--really bad dry skin/hang nails, or a scrape or sore spot or something. I'd rather use it on something that is out of the way and unlikely to leave spots all over everything I touch, like my elbows, which are notoriously dry.

Overall, I think that this is a really great kit, and I would both purchase it again as a set, as well as each of the items individually (except probably the chapstick, but my roommate is more than happy to take it off my hands). It's a nice way to get an introduction tot he company and products, and I would highly recommend it as a gift for a beauty lover, anyone with dry skin, or anyone with allergies to conventional products. All of their ingredients are all natural and completely pronounceable, which is nearly impossible to find these days and something that really endears them to me.

Five out of five stars!

Tuesday, July 24, 2012

For the Newbies in the Room

When I started nail blogging (I know, all of a month ago) I really had no idea what I was doing. I didn't know anything about the new nail products that have been released in the past ten years. I'd never even heard of stamping. It never occurred to me to use a tiny paintbrush to freehand stuff on your nails, rather than the brush the polish came with. I thought I was getting fancy when I layered a glitter polish over a creme, and I still don't have a clearly defined image in my head when someone mentions "jelly" polish.

So while this is old news to most of you, today I want to say a couple of things about Seche Vite that I wish someone had told me when I first got started. It would have saved me a lot of grief and a few bucks on inferior topcoats. If you already knew this, then feel free to skip this post. If you're asking "Seche who?" then please keep reading.

Seche Vite is awesome.

If you've been reading nail blogs, then you've probably gathered at least that much by now. Everyone talks about it, but very few people actually say what it is:

Seche Vite is a quick-dry topcoat. Depending on where you find it, it ranged between $5-7, and it is worth every penny. It can be found at some drug stores (so I've heard), and I've also seen it at Giant Eagle and Target (that's where I've found it the cheapest).

Why is it different from other topcoats? To be honest, I'm not sure. There's something in the formula that is way above my pay grade to figure out (I'm an artist, not a chemist). But as soon as you open the bottle, you know that there is something different in this one. It doesn't smell like polish. It smells...more like spray paint. I think it's a true lacquer, rather than a polish, but since most of my bottles are missing their ingredient lists, I can't tell you what the magic ingredient is. But know that it is there, it works, and that this is chemically different from every other topcoat on your shelf. Sally Hansen can't hold a candle--trust me.

SV is a topcoat that is meant to be applied thick. It makes me think of clear resin when I put it on, and just like it says on the box, it dries super fast--under a minute.

I've tried other quick dry top coats. Usually they peel off, or they smear the fancy designs I've worked so hard to produce, or, sometimes, they take longer to dry than the polish I put them over.

Not SV. It added 1-2 days of wear to my manicure, meaning that instead of chipping, flaking, and peeling off within 24-48 hours, even my most elaborate paint jobs lasted at least 2-3 days with minimal tip wear, and I'm pretty hard on my nails. As soon as it starts to chip, I have to pick at it. It's a compulsion. But not only did it hardly chip, even with a little--ahem--help, my polish wouldn't go anywhere. Tough as nails, indeed.

And even on newly applied polish, it doesn't smear patterns or designs.

So there you have it. Something that I wish someone had told me when I got started in nail art. Save yourself some trouble, spend the extra $2 on the good stuff, and watch the results improve.

Thursday, July 12, 2012

Quick Review: Burt's Bees Lemon Butter Cuticle Cream

Remember a couple of weeks ago when I picked up this from Target?


$5.99 for .6 oz/17 g, Target.

I've mentioned before that I adore the smell. I want to take a bite out of it. Probably not wise, but looking at the ingredient list it probably won't kill you, and is unlikely to even make you sick. It is certified 100% Natural, and not tested on animals.
The back of the tin, so you can see the ingredients.

The base of the product is beeswax, so it has a bit of a waxy texture, and feels a bit greasy when you put it on, but no more so than some lotions and once it gets rubbed in it doesn't last for too long.

I started out using this on my cuticles, and have noticed a steady improvement in them (I should have taken a pictures of my right hand at the start of this so you could see how bad they were. They had actually cracked and separated themselves from the nail bed. It was bad. When they started bleeding, I figured something ought to be done). However, I've been using it in concert with the cuticle pen (see my stash page for more info), so I wasn't ready to attribute full success to the cream.

Then Monday night I was doing the prepwork for what would eventually become Wednesday's manicure and Friday's pedicure, and thought, "Hey, why don't I try this on my feet?"

I have what might be the driest skin on the planet. Eight glasses of water has little to no effect on it. I use lotion and moisturizer twice a day and my hands still look like the bottom of Death Valley. I have actually cut myself on the callous on my feet because they are so dry and hard.

So I took the Lemon Butter and rubbed it on my heels, the inside of the ball of my foot, and the side of my big toe, where the hardest, scratchiest, ugliest callouses were.

I won't say that they were gone. But within 24 hours, it was like I had new feet. The callouses felt smaller. They're softer. They're still pretty dry, but they aren't nearly as rough.

1 application.

24 hours.

Color me impressed.

I know that Burt's Bees does make a similar cream intended for feet, and after this I might look into it...but only after I've used up my Lemon Butter.

Verdict: Gimme more!

Wednesday, June 27, 2012

Watch Me Shine


:) I had to. I love both the movie and that song. And it's so appropriate for this post.

And really, is there anyone better to represent a beauty blog than Elle Woods?

But seriously, it was just so right for this post, since I'm reviewing the "Oh So Bright" collection from The Balm.

For starters, who can resist the packaging? Vintage pinups combined with funny play-on-word titles like Shady Lady, Staniac, and Meet Matt(e)--hell yes!

I've been eying this stuff for ages, but kept talking myself out of it because more than once I've been known to buy something based on the packaging only to be disappointed. For another, I don't like trying strange makeup since I'm allergic to a lot of it. It's really had for me to find makeup in a good consistency that contains neither fragrances nor soy (eventually I'll write a little more about that, but not today). Mostly I've seen the kits at Marshalls, and there will be one or two things in them that I like, but the others are either high in the allergy potential (like mascara) or just aren't my thing.

Then I found this kit.

To begin with, let's look at the cosmetic bag it comes in: cute and reusable, both plusses. Second, do you see the MSRP in the upper right hand corner? $59. That is more than I spend on gas in a week. It's more than I spend on food.

BUT, if you're a bargin hunter, you can find these kits for $10 or less. Mine was $9.99 at Marshalls.

So, packaging: 10. Price: 11! Let's look at the contents, shall we?

First up, the Mary-Lou Manizer.

I passed on this kit a couple of times because I don't use luminizer, but the package says it can also be used as an eyeshadow. So I thought, What the hell? I'll give it a shot.

In the compact, it's a nice brown with some gold tones to it--almost the same color as my skin when I have a little bit of a tan (like right now). "Ah," I thought, "Another nice brown eyeshadow." Because browns are my favorite. I like a natural look that doesn't smack you over the head. Yes, I like to mix it up some, but for work I go pretty neutral in my makeup.

I swept on just a touch using the Mini Buki brush that came in the kit, and WOW. It was so bright! A great golden tan, it went on really nice (I did have to even it out a little with my finger since I'm not used to using a brush like that on my eyes). I love the color. It is so perfect, and could be good with day or evening looks. Bonus: it'll work great with the eye shadows I already have.

Next up, a Pump Your Pucker lip gloss called Pink My Lemonade, which is just the cutest title ever. Shimmery and semi-transparent, it's just a couple of shades darker than my natural lips, and the texture is awesome. It's smooth, and after a couple of minutes it's not nearly as sticky as most of the other lip glosses I've tried--which happens to be my pet peeve with lip gloss. I can easily see myself wearing this both on it's own and layered over my favorite lip stain. In fact, I wore both the gloss and the luminizer to my birthday dinner on Sunday, and then to work the next day.
Swatches of the lip gloss and luminizer. The luminizer shows up a lot better on my eyes, but I'm not quite ready to start posting pictures of my face, even in part.

Last, we have a Hot Ticket nail polish. The color is "Princess." It's a nude base with pearly shimmer in it. It went on super easy. Dry time was pretty average (about 15 minutes), so if you're in a hurry it would benefit from a quick dry top coat.

I'm not real big on nude polishes of any sort, but I can see this color being a useful one to have in my palette. It's a little translucent for my taste as well. Here you can see two coats.

Overall, I thought the color was kind of blah, but like I said, I'm not a big fan of the nudes or the pearly colors, but I like the formula and would like to try it in a different color. It is 3 free.

I loved this set and would definitely buy everything in it again--though like I said, different color on the polish. It got me really wanting to try some of their other products, and I'll be looking at the more closely when I see them around now. The more I use them, the more I can't believe what a deal I got! The Mary-Lou Manizer alone sells for $22 on their website, so to get the whole kit for $10 is a steal, even if you take brand name out of it and just look at the quality of the products. I doubt I could have gotten a shadow, gloss, brush, and polish of this quality from Target even if I was buying the store brand (and y'all know how I love my Target). I don't think I could ever consider paying the full retail for it, though, which is sad because I like supporting good companies. I think the most I'd be able to stomach would be $30, but that's speaking from my end of the shoestring. Your mileage might be different.

If you haven't tried anything by The Balm, I highly encourage you to. Also, check out their website, since the company is peopled by some fabulous ladies and dogs!

Monday, June 25, 2012

From the Boudoir

It is shockingly easy to go from one thing to another when beauty blogging. At first, I just wanted to talk about manicures. But that got into nail polishes, and all those pictures of my hands meant I had to work on my cuticles, which then made me think about lotions, and then...

Well, you can see what I mean. Everything is connected! It's kind of beautiful, like a well constructed tapestry.

So, with that in mind, I thought that I might share my thoughts on a few products I've finished up in the last couple of weeks:


We'll start on the left, with the Up & Up Women's Shave Gel. I don't remember what I paid for it, but it was less than $2 at Target. I really like the texture of the gel, which is very smooth and has a good lather to it--it also stays in place a lot better than other products I've tried. This was also the first shaving gel I've tried that actually made a difference in my skin (granted, it's been a few years. Yeah, that's how unimpressed I was before). I gave this a shot out of desperation, because my skin was so dry and no amount of lotion seemed to help. It also made my razor bumps go away within a week or two, and those have ALWAYS been a problem for me, even when I tried using shaving products in the past. As a bonus, it's got a really good, very light scent which I love. I would definitely buy this again.

In the middle we have the Up & Up Strengthening nail polish remover. I'm not going to talk about this one here, because I already added a review to my stash page (<---The link is in the sidebar).

Lastly, Color Me Sexy Volumizing Conditioner. I bought this at Marshalls probably three years ago. I'd seen it at work and heard good things about the brand, so when I saw a set of shampoo, conditioner, and leave in conditioner on sale for what I would normally pay for just my shampoo and conditioner, I decided to try it out--especially since I don't dye my hair as often as I need to and want to preserve the color, and like most girls with straight, fine hair, it's hard for me to get volume without frizz.

My overall feelings about this...meh. For starters, this product smells a bit like black licorice. Points for being unusual are quickly negated by the fact that it's the one candy I absolutely can't stand. It took me a few tries to get used to it, which is one reason it took me so long to use this up. I actually finished the shampoo over a year ago (it was more tolerable when I was washing it out) but I think I still wound up throwing out some of it, based solely on the smell. Did it help my color last? Yeah, I guess...but no more than any other shampoo for color treated hair on the market.

Then we get to the conditioners. The only reason I held on to these is because I hate throwing out things that might still be useful, and I was loathe to replace them when I still had some left.

Eventually, I got used to the conditioner and it didn't bother me any more. My #1 peeve with this one was that it's SUPER thick. Like, can't hardly get it out of the bottle thick. Like, take off the dispenser top, squeeze it out through the neck, and wind up with a cylindrical chunk of conditioner that holds it's shape in the shower. Eventually, in frustration, I squirted about a quarter of the regular conditioner into the leave in conditioner bottle, and then added water until I got a consistency I liked and could work with. This stuff was so thick that I started using it as a leave it treatment, but even then I had to thin it out quite a bit because it left a residue on my hair. What I finally ended up with was something slightly thicker than the Garnier Sleek and Shine leave in--and while I could finally squirt it out through the cap, it still held it's shape even when exposed to water. I'm telling you, you could sculpt with this stuff.

As for the leave in...I still have some of it left. It's okay. It's a spray-on treatment that really only seemed to work after I added some of that super-thick conditioner to it. Out of the three, this is the one I like the best.

Did it give me volume? A bit. But I still had lots of problems with frizz. Overall? Wouldn't buy it again, and I can't wait to go back to my standard shampoo and conditioner.

I need a rating system of some sort, like the Hammie points on Polished Indulgence. :| Any suggestions? (speaking of which, I clicked on Hammie to find out where she got him and found this adorable dog. He reminds me of my baby, Sam, who resides with my mom and dad.)

Happy Monday!

Friday, June 15, 2012

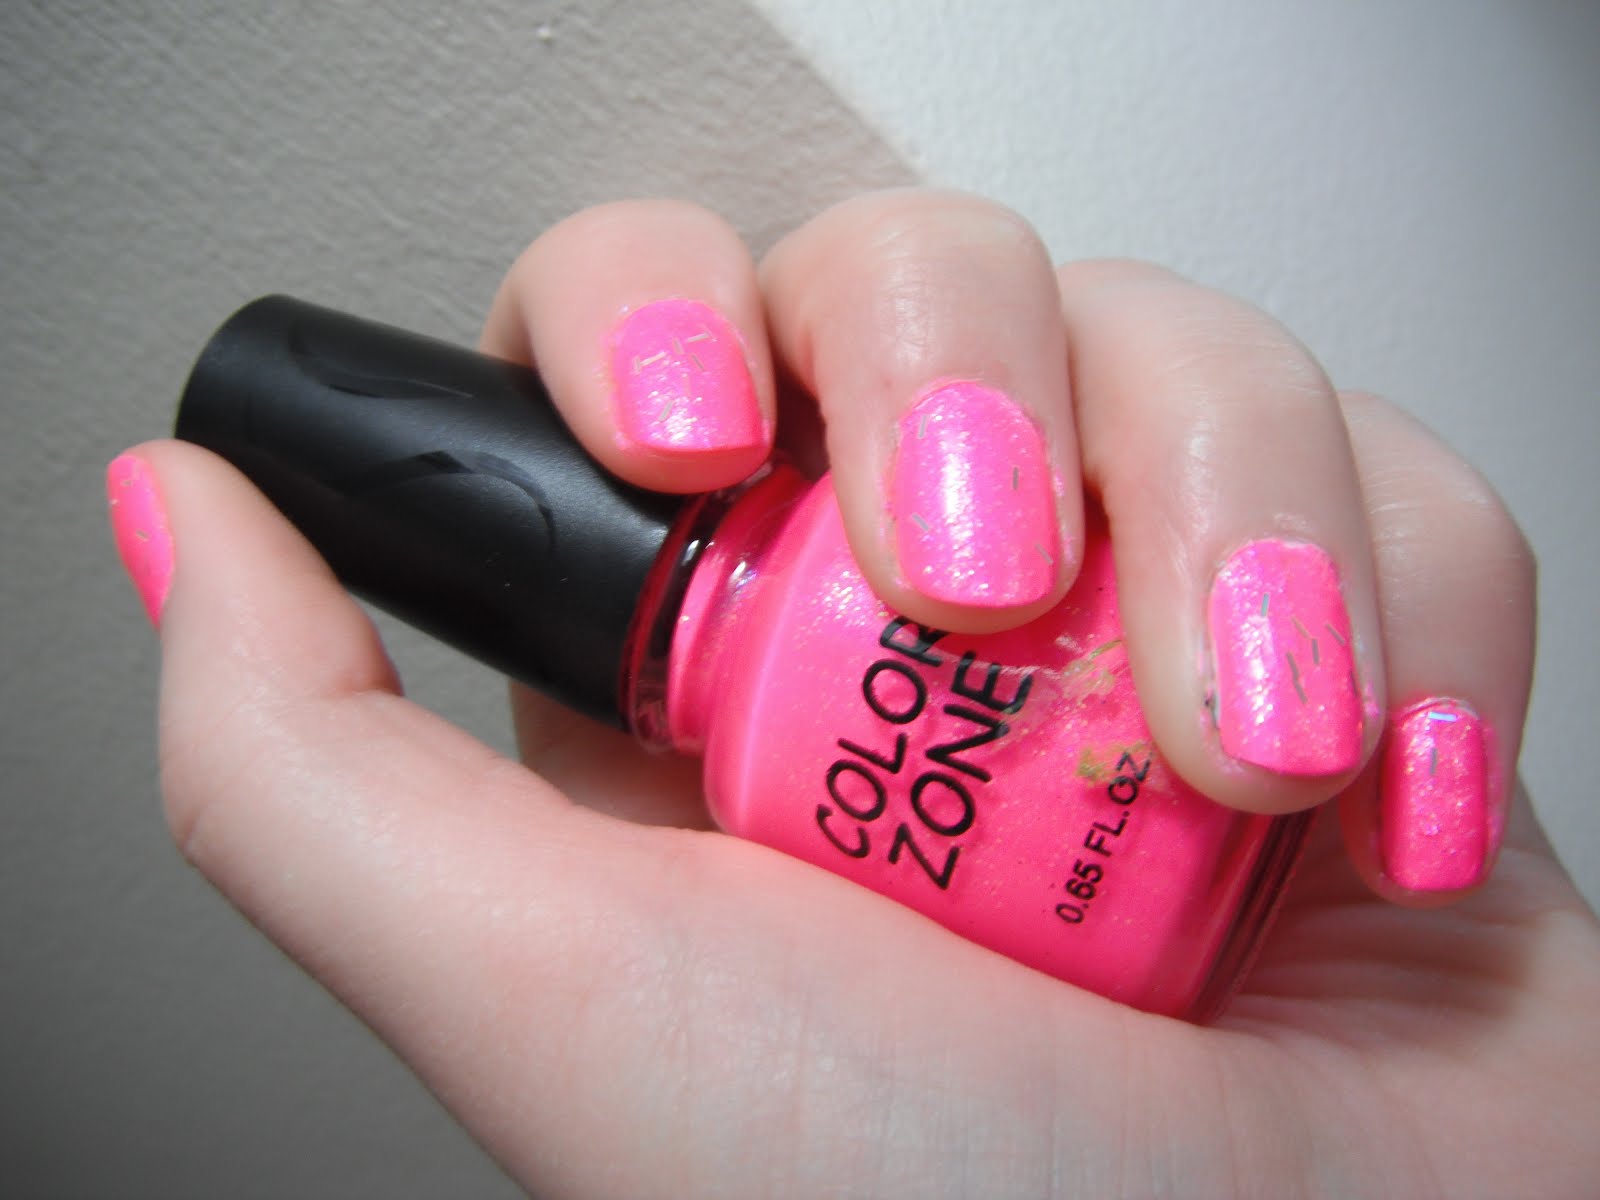
Friday Finds, and Color Zone Florescent Pink Review


There is a small, slight chance -- tiny, really -- that I've gone a little overboard this week.

I just couldn't help myself. I was so excited by all the blogs I've been reading, and the tutorials, and having this new blog myself.

So, here's the breakdown, from left to right:
Pop Beauty Nail Glam kit with #4 Black and #58 Split Silver (crackle coat). ($4.99, Marshalls)
Modella Purse kit with flamingo pattern (because I had to. See below) ($2.89, Walmart)
Winning Nails #704306 nail art brush ($4.79, Sally's Beauty Supply)
Maybeline Color Show in #380 Porcelain Party and #280 Plum Paradise ($2.89 each, Walmart)
Color Zone Set including a clear glitter, a florescent glitter pink, and a florescent glitter purple (color names/numbers were nowhere on the packaging or bottles, oddly enough) ($4.99, Marshalls)
Up & Up set of 32 Cosmetic Wedges ($1, Target)
Sally Hansen Insta-Dri anti-chip top coat ($4.49, Target)
China Glaze Celtic Sun ($6.49 Sally's Beauty Supply)

Not pictured:
Sally Hansen Insta-Dri in Blue By! ($3.59, Target)
Sally Hansen Maximum Growth Cuticle Pen ($5.99, Target)

Whew! That should keep me busy. I've been dying to get my hands on some florescent colors ever since I saw this manicure, so that's what I was most excited about. My camera really doesn't like bright things, so it doesn't quite do these colors justice, especially the pink. The second photo is a bit closer to the truth:


I tried swatching the pink this morning, and this is what came out:


That's three coats of the Color Zone pink over 1 coat of the Porcelain Party, topped with the glitter.

Both of these colors are rather streaky and sheer (I'll talk more about the white when I swatch it by itself). The pink is both thin and kind of gloopy, which is an odd combination. It makes it very difficult to apply evenly, and in order to really get the color to pop you MUST have a white basecoat. If I ever use this color straight again, I'll do two coats of white and two of the pink (though I might still need three), just to give it a really good base. As you can see in this swatch, even after three coats, you can still see where the white base didn't completely cover the nail, so I've got some streaks that still show through.

It dried almost instantly, which I like (though I did have the desk fan going at the time, and that probably helped a bit), and was nice and bright without being blinding. The tiny amount of glitter in this polish seems to add more of a texture than a sparkle; most of it winds up being covered by the polish rather than on top of it, so just for kicks I took the clear glitter and put that on top. Even though there's a good amount of glitter in the pot, it was more content to stay on the brush than on my nails. It did add a little much-needed shine, but not as much as I had hoped, and it helped a little with the bumpiness of the glitter.

Overall, I found it disappointing, but I'm reserving final judgement until after I do the water marble.

I did do a little research on Color Zone for this post -- or at least I tried. They don't seem to have a website, nor does their parent company, Blue Cross Beauty Products. So the color names/numbers shall remain a mystery for the time being.

*I love flamingos, I collect all things tropical, and as I found out this week, my first short story, "Birds of a Feather", which is about a Wereflamingo (yes, a Wereflamingo) will be published on July 11! So this was a bit of a celebratory splurge. :)